Pages

About Me

My photo
Bethlehem, New Hampshire, United States
E-mail contact: randonneur8@yahoo.com | Facebook: facebook.com/1HappyHikerNH

Text Above Search Box

SEARCH MY BLOG USING TEXT BOX SEEN BELOW:

29 May 2013

Memorial Day Weekend in the Adirondack Mountains of New York

For the 2013 Memorial Day weekend, Cheri (my wife) and I made the 4-hour drive from our home in Bethlehem, NH to Saranac Lake, NY.  This charming village is centrally located in the high peaks region of the Adirondacks.

DAY 1:

Most of the first day of our 4-day weekend was spent driving over to NY in conditions that were unusual for late May, even for northern NH and NY!  Along our route we experienced both snow and rain.  Yikes!

DAY 2:

By Day 2, the snow had subsided, but the rain continued.  We made the most of the rainy conditions by taking our umbrellas and visiting locations where we could view waterfalls, brooks, and rivers that were wildly raging due to all the rain.  The next two photos show some scenes along the West Branch of the Ausable River.
Raging waters along West Branch of Ausable River
Raging cascade along West Branch of Ausable River
And shown below is yet another photo from Day 2.  This is a more sedate scene from the shore of a beaver pond.
View from shore of beaver pond on a rainy, misty day
DAY 3:

Day 3 was a day filled with gorgeous weather. Cheri opted to spend a portion of the day soaking in the sun on the shore of Lake Flower and reading a novel.  And, she also walked into the village of Saranac Lake to witness the Memorial Day parade.  Shown below is a photo Cheri took of this event.
Memorial Day parade in Village of Saranac Lake, NY
A portion of my Day 3 was spent hiking to Catamount Mountain (3,168 ft elevation).  This trek provided lots of rock scrambles which is something I thoroughly enjoy.

The next photo shows Catamount Mountain as viewed from the roadside just a short distance from the trailhead.
Catamount Mountain as viewed the roadside just a short distance from the trailhead
The first 1.3 mile or so of the trail is mild-mannered.  But after that, the fun begins with a scramble up a narrow chimney which is nearly vertical.  How narrow is it?  Well, anyone who has met me knows that I'm a fairly skinny guy.  I was unable to squeeze through it with a frontal approach.  I was able to squeeze through it by turning sideways.  However, it necessitated taking off my backpack and pushing it up ahead of me.

Shown below is a composite photo of the chimney, but it doesn't do justice to the narrowness of this passageway.
Narrow chimney along the trail to Catamount Mountain
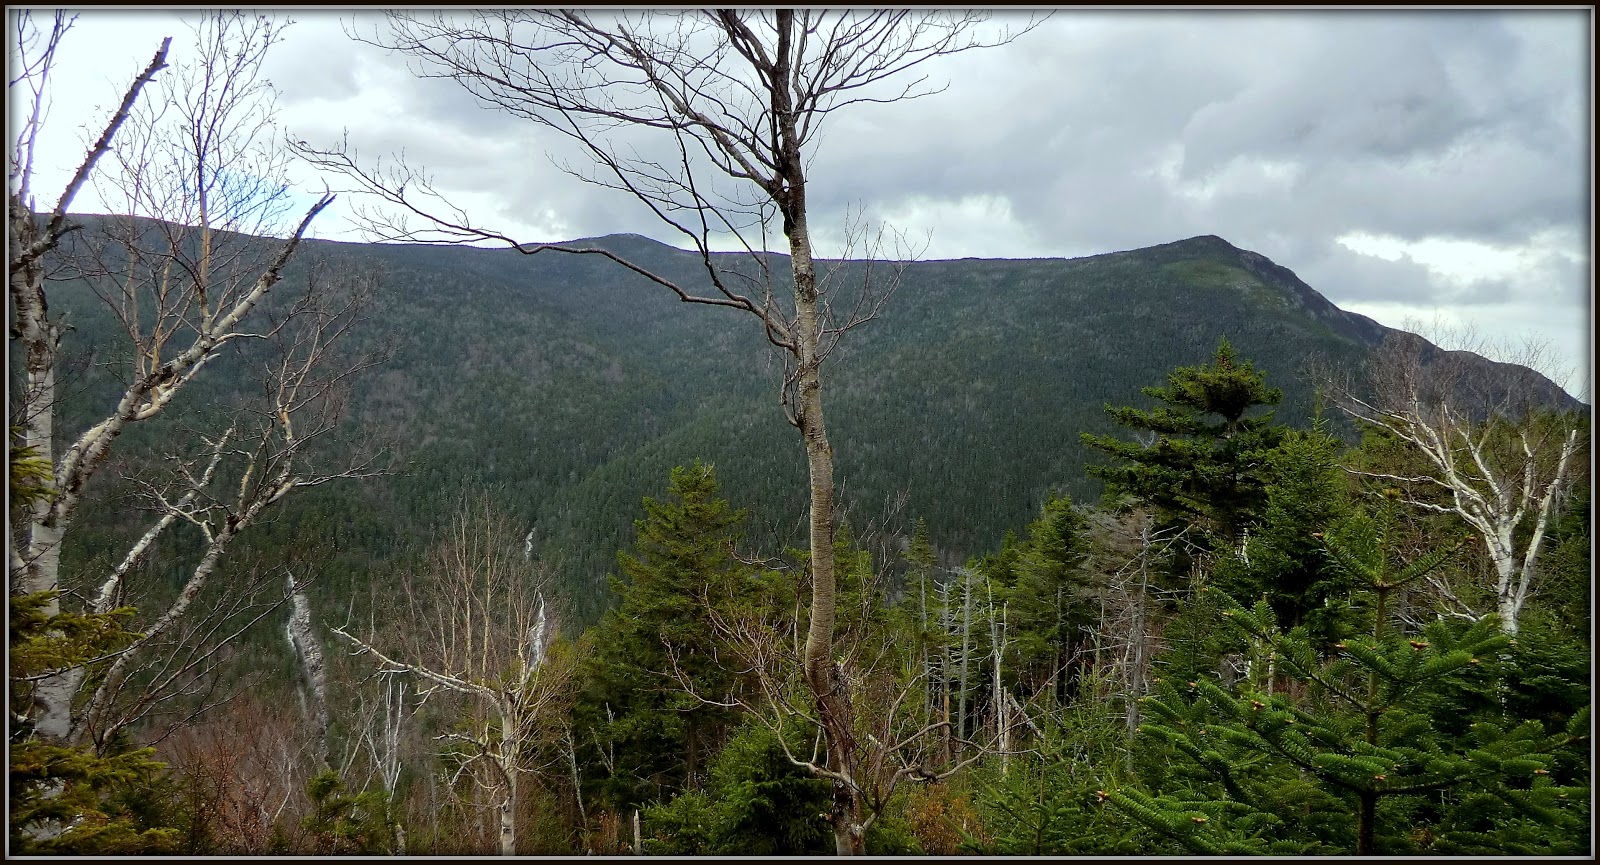
Within minutes after negotiating the chimney, I arrived at the top of the south summit of Catamount.  From there, I was able to get a view of the main summit of Catamount (see next photo).  The climb to the main summit was an exhilarating scramble.  I loved it!
Main summit of Catamount Mountain as viewed from south summit
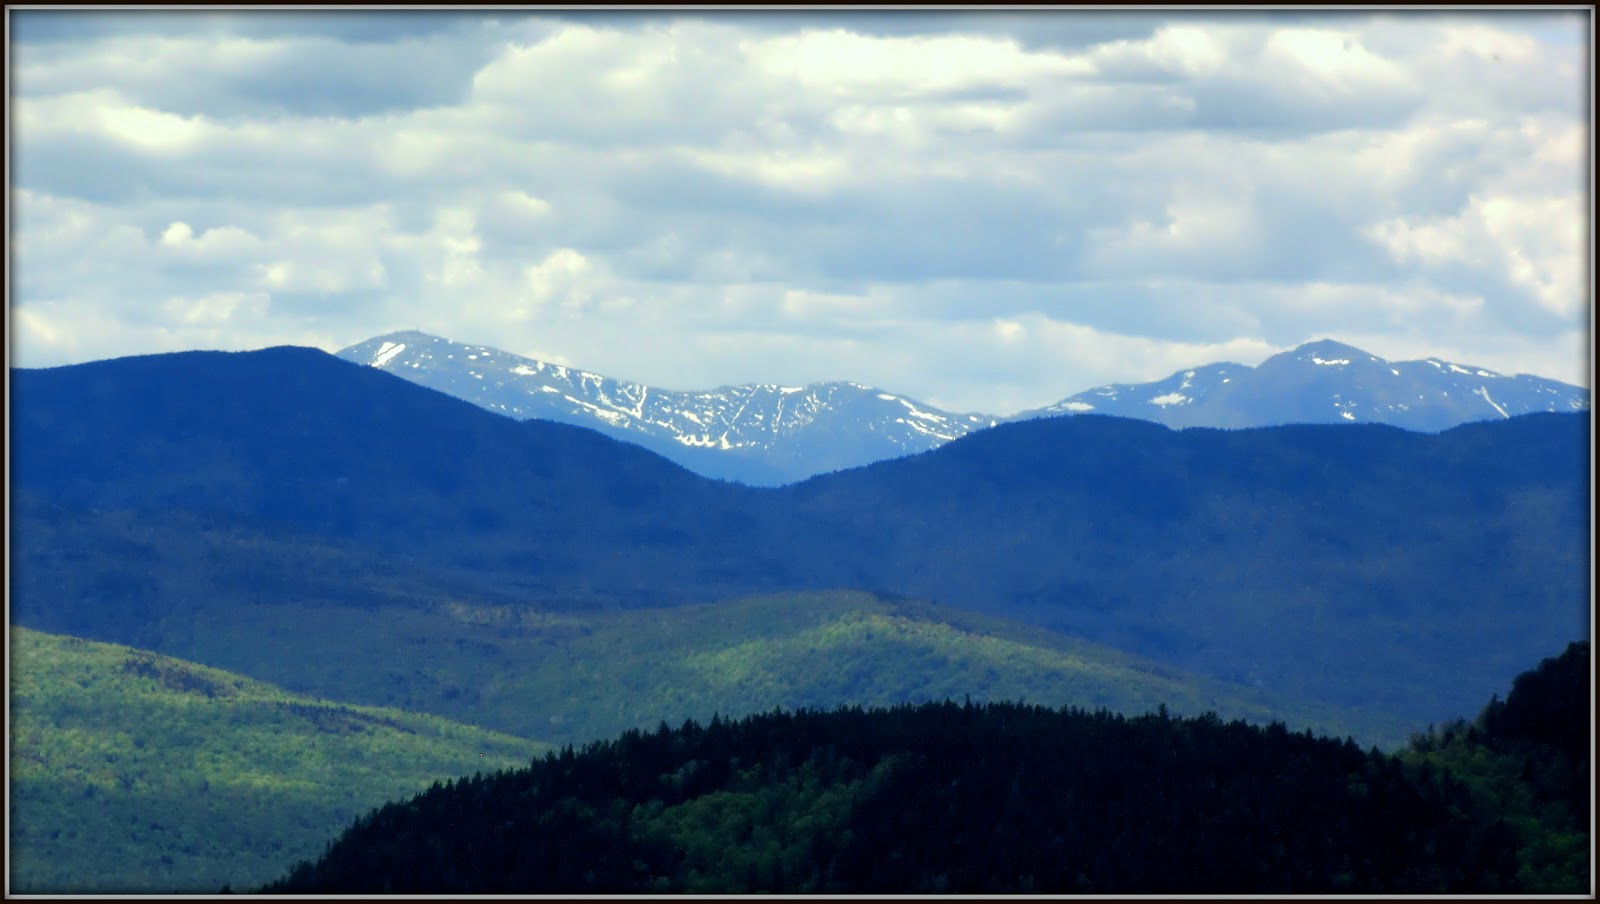
Upon reaching the main summit of Catamount, I relished the 360 degree views.  One of the more impressive views is the one shown in the next photo.  At the bottom left is the south summit of Catamount.  Off in the distance on the right is the snowcapped Whiteface Mountain with Esther Mountain in front and to the left of it.
South summit of Catamount (bottom left); snowcapped Whiteface Mountain at top right
The next photo is a zoomed view of Whiteface Mountain.
Zoomed view of Whiteface Mountain
Although the quality of the next photo is poor, it sort of shows what I could see with my binoculars when looking eastward toward Vermont.  In this zoomed photo, you can see portions of Lake Champlain. And in the top center of the photo, you can see the snowcapped Mt. Mansfield which is over 50 miles away in VT, as the crow flies.
Highly zoomed photo: Lake Champlain with snowcapped Mt. Mansfield at top center
The next photo doesn't do justice to the overall scene.  What I'm attempting to show is the contrast between the flowering shrubs at the top of Catamount, as juxtaposed to the snow that covers the mountaintop.
Flowering shrubs at top of Catamount, as juxtaposed to the covering of snow
Before leaving Catamount, I took a photo of the metal benchmark disc embedded at the top of the mountain.
Metal benchmark disc at the highpoint of Catamount
Toward the end of Day 3, Cheri and I drove a short distance out of the village of Saranac Lake to the Adirondack Loj on Heart Lake.  Lodging is available at this location, and it's a major trailhead for several mountains in the high peaks region of the Adirondacks.  Along the road leading to this location are impressive views such as seen in the next photo.  Mt. Colden is on the left, and peaks in the MacIntyre Range are on the right.
View from Adirondack Loj Road: Mt. Colden (left); peaks in MacIntyre Range (right)
Day 4:

On Day 4, we packed up and started to head for home via a route that was different from the way we came.  We decided to head north toward Plattsburgh, NY and then onward nearly to the Canadian border (at Rouses Point, NY) where we would cross over the top of Lake Champlain and head eastward to our home in Bethlehem.

At Plattsburgh, we made a short stopover in order to walk to the end of Dock Street to look across Lake Champlain and enjoy the views of the Vermont mountains.  The next two photos provide some idea of what we saw.  The first snapshot is a wide view that is un-zoomed.  The second photo is a zoomed view of Camels Hump mountain as seen through the masts of several sailing ships moored at the docks.
View from Plattsburgh, NY looking across Lake Champlain toward Vermont mountains
Zoomed view of Camels Hump mountain from docks in Plattsburgh, NY
To sum it up, Cheri and I agreed that this was one of the more enjoyable Memorial Day weekends that we've spent in quite a number of years. 

19 May 2013

A Pleasant Springtime Hike to Puzzle Mountain (Maine)


Perhaps a reader of this Blog will be able to provide some information as to origin of the name "Puzzle Mountain", otherwise it will remain a mystery  to me.   Regardless, my friend Marty and I decided to drive over to Maine and hike to this mountain that is bestowed with such an intriguing name.  It would be a new destination for both of us.

To reach Puzzle Mountain (3,133 ft.) we began at the eastern trailhead for the Grafton Loop Trail which is located on the east side of Rt. 26 (4.9 miles north of its junction with Rt. 2 at Newry, ME).  We decided to forego incorporating the Woodsum Spur Trail into our itinerary.  We just did a simple 6.4 mile (round-trip) hike using the same route for both the outbound and inbound leg of our trek.

A portion of the Grafton Loop Trail, and all of the Woodsum Spur Trail, is located on the Stewart Preserve, which was named after Bob Stewart, who donated the land to the Mahoosuc Land Trust for permanent protection from development. The Woodsum Spur is named after Ken Woodsum, a forester and conservationist who was instrumental in protecting Puzzle Mountain, and who first explored the route of the current trail with Bob Stewart.

And so, with that brief introduction, perhaps the rest of the story can best be told by the photos taken during our hike.
Starting point for hike to Puzzle Mountain (eastern trailhead for Grafton Loop Trail)
Hiking through a beautiful spring-green forest
At about 2.4 miles into the hike, the trail reaches exposed ledges which offer spectacular views of the Sunday River Ski Area, Grafton Notch, and the distant Presidential Range.  If you should want a shorter hike, then these first ledges would make a fine destination unto themselves.
Southwesterly view: Sunday River Ski Area (left); Presidentials (center, distant horizon)
Zoomed view of Presidentials from lower ledges of Puzzle Mountain
Marty admiring northwesterly view toward Old Speck and the Baldpates
Couple who posed while looking northeasterly from main viewpoint on Puzzle Mtn
Sugarloaf Mountain (4,250 ft) is one of the peaks visible in the next photo.  It's the third highest mountain in Maine, after Mount Katahdin's Baxter Peak (5,268 ft) and Katahdin's Hamlin Peak (4,756 ft).   In the caption below the photo, I've made an attempt at identifying the major peaks.  Corrections from any reader will be most welcome!
Zoomed northeasterly view: Saddleback & the Horn (left); Sugarloaf  & Spalding (right)
When you are at the main viewpoint, you might think you have reached the top of the mountain since there are three metal benchmarks (triangulation stations) at this location in close proximity to each other.  One of these benchmarks is shown in the next photo.
One of metal benchmark discs at main viewpoint on Puzzle Mountain
However, the true summit of Puzzle Mountain is about 0.3 miles (as the crow flies) from this main viewpoint where most hikers stop (see map presented below).
Approximate location of main viewpoint in relation to Puzzle Mountain's true summit
(Click to enlarge)
As the map indicates, a short bushwhack is required to reach the Puzzle Mountain's true summit.   It's a completely wooded summit with no views (see next photo).  The only thing of interest is a canister where peakbaggers can sign the logbook.
Woods surrounding Puzzle Mountain's true summit
On the way from the main viewpoint to the true summit, there is one short steep spot.  However, the trail builders thoughtfully embedded a set of metal rungs to assist hikers with negotiating this vertical slab of rock.
Metal rungs to assist hikers with negotiating a vertical slab of rock
I'll conclude with a "photo bouquet" of some of the spring wildflowers that were seen during this hike.
A "photo bouquet" of some of the spring wildflowers that were seen during this hike
To sum it up, this trek to Puzzle Mountain was similar to a hike that was done to the Baldpates in September 2012 (click HERE to read that report).  As to which one I prefer, that would be a tough choice!  They were both thoroughly enjoyable adventures in the Grafton Notch.  For any reader who has never hiked in this area, I would highly recommend that you give it a try.    

15 May 2013

Cliff at East End of Mt. Tremont: Mission Accomplished!


For anyone who possibly reads my Blog on a somewhat regular basis, you might recall that about 2-weeks ago I posted a report regarding Mt. Tremont (Click HERE to view that report).  Toward the end of that report, I mentioned an aborted attempt to climb to the top of a cliff that is located at the east end of Mt. Tremont.  There was lingering Springtime snow on my approach route which was simply too deep to easily negotiate without snowshoes.

It nags at me when I fail to achieve a goal.  And so, another attempt was made to reach the cliff.  However, this time I would approach it from its south-facing side where there was a high likelihood that the mid-May sun would have melted the snow.  Some details about my route will be presented at the end of this report, but first of all, here are some photos.

Just to get you oriented, the first photo shows the cliff that was the object of my attention.
Labeled photo identifying Mt. Tremont and the cliff at its east end
Shown below is a wider view of Mt. Tremont and the cliff at its east end.  This photo was taken from a clearing along my approach route to the cliff.
Mt. Tremont and cliff at its east end (as viewed from a clearing along approach route)
The vistas from the top of the cliff exceeded my expectations!  There is a huge southeasterly view that features Bear Mountain, Mt. Chocorua, Mt. Paugus (next photo).
Southeasterly view featuring (left to right) Bear Mountain, Mt. Chocorua, Mt. Paugus
When gazing nearly due south, there is a vista that features  Mt. Passaconaway and Mt.Whiteface, as well as Square Ledge and a portion of Mt. Paugus.
Mts. Passaconaway & Whiteface, plus Square Ledge and a portion of Mt. Paugus
Looking northward, you can see the tip of Bartlett Haystack.  If you've ever bushwhacked to that mountaintop, then you can sort of envision the location of the tiny viewing ledge at the peak.
Looking northward, you can see the tip of Bartlett Haystack
The next two photos are highly-zoomed (and poor quality) images of a couple of things you can see with binoculars from this cliff at the east end of Mt. Tremont.  The first image shows the easily recognizable Mt. Chocorua.  The feature shown in the second image is not as obvious.  It shows the rocky summit area of one of the Moats (probably Middle Moat).
Highly-zoomed photo of Mt Chocorua (as viewed from cliff at Mt Tremont's east end)
Highly-zoomed photo of rocky summit of one of the mountains in the Moat Range
The next photo is simply a collage of other attractive items that were seen during my hike to the top of the cliff at Mt. Tremont's east end.
Collage of other attractive items seen during my hike
And now as promised earlier in this report, here are some details about the route that was taken.  Shown below is a map with several items that are labeled.
Map showing route that was taken (CLICK TO ENLARGE)
Please understand that the route taken on this adventure is NOT the only way to access the cliff at the east end of Mt. Tremont.  But, if you should opt to follow my route, then there are some things that should be mentioned, as follows.

For the majority of my trek, I followed old logging roads.  Shown below is a photo that shows the starting point of my route which began at a roadside pull-off along Bear Notch Road. 
Beginning of the route at the roadside pull off along Bear Notch Road
When looking at the map shown above, you'll note that shortly after leaving the roadside pull-off, I made a sharp left turn onto another logging road.  This turn is NOT at all obvious.  And actually, you'll travel several hundred feet before the corridor begins to resemble a logging road.  Your tendency will be to stay on the road that you're already on since it has a well-worn path, and it appears to be headed in the right direction.  Don't do it.  Find the turn, and head for the logging road highlighted on the map.  It gets you to higher ground and away from the muck lower down along Douglas Brook.

After finding and making the turn, the logging road corridor will eventually become apparent, and the majority of it will look like that which is shown in the next photo.  However, there are a few low-lying areas with standing water where the drainage has failed.  It's easy enough to work your way around those areas by walking alongside the road in the adjacent open woods.
Typical segment of logging road corridor en route to cliff at east end of Mt. Tremont
There is one last item to mention.  Not shown on the map are a number of side roads that branch off the main logging road, and some of them seem to be going in the direction you want to go.  The only advice I can offer is to sort of feel your way, and to stay on what appears to be the most traveled roadway.  Most likely, if a mistake is made, then it will soon become obvious before you've traveled very far along the wrong road.

To sum it up, this was a focused adventure with the single goal of reaching the top of the cliff at the east end of Mt. Tremont.  As mentioned in the title of this report, "Mission Accomplished"!  Besides achieving my goal, this trek also afforded  some insights regarding the topography and the characteristics of the nearby woods.  As a result, there are now some other ideas being considered for future off-trail adventures in this general vicinity.

11 May 2013

Mt. Willard's Less-Visited East Side


Because of how they are situated within Crawford Notch, it is difficult to find a spot where you can get a side-by-side view of Flume Cascade and Silver Cascade, and where you can see nearly the full extent of these cascades from top to bottom.  There are a couple of locations on the east side of Mt. Willard where such views are possible, although the vistas are partially obstructed by tree branches.

This mini-adventure is presented more for general interest than anything else.  It would be unkind to recommend this trek to anyone other than those who are completely comfortable with traveling off the established hiking trails.

The first of two locations that I visited was a rather quirky spot in the woods about 350 ft. east of the Mt. Willard Trail (about 0.3 mile before the trail ends).   Although the distance was short, it was a tedious and moderately intense bushwhack through thick conifers.

The second location was reached by taking the abandoned Hitchcock Flume Spur Trail, which branches off the east side of Mt. Willard Trail (about 0.1 mile before the trail ends).  The spur trail is rough (about one-step above a bushwhack), and steep (about 250 ft. elevation loss over a distance of about 0.15 mile).  Anyone hiking this spur trail should use extreme caution since there is a very dangerous drop-off near the end.  Also, just the same as with bushwhacking, eye-protection would be a good idea.

The two locations mentioned above are shown on the map presented below.
Map showing two locations where photos were taken (CLICK TO ENLARGE)
Although this trek began with partly sunny conditions, it deteriorated rapidly to a dreary day with on/off showers and drizzle.  The weather conditions combined with tree-obstructed views resulted in some rather lackluster photos.  Nonetheless, shown below are 4 snapshots taken from  the spots identified as "Location 1" and "Location 2" on the map presented above.
Location 1: Flume and Silver Cascade (lower left): Mts. Jackson & Webster on horizon
Location 1: Zoomed View of Flume and Silver Cascade 
Location 2: Flume and Silver Cascade (viewed from Hitchcock Flume Spur Trail)
Location 2: Crawford Notch (viewed from Hitchcock Flume Spur Trail)
To sum it up, despite the weather, which deteriorated from decent to dreary, this mini-adventure was still a lot of fun, and it provided some unique views.

06 May 2013

A Cliff Named Owls Head, and a Waterfall Named Waternomee


Although peakbagging is a laudable activity, it holds little interest for me.   But, as with most things, there are exceptions!

There are six named peaks in the Benton Range (Black Mountain; Sugarloaf Mountain; the Hogsback; Jeffers Mountain; Blueberry Mountain; and Owls Head).  At one time or another, I had hiked to all of those mountains, except for Owls Head.  And so, in order to complete the set, I decided to become a peakbagger and hike to this little 1,967 ft. peak.  But somehow, I don't think there is an award or patch given out for completing all the peaks in the Benton Range! :-)

There's not much to be said, other than this was a short and easy off-trail adventure that was launched from the Blueberry Mountain Trail.

On my way to the trailhead, I pulled off the road to take a photo of Owls Head as viewed looking across Olivarian Pond.
Owls Head as viewed looking across Oliverian Pond
As you might imagine, there are several viewpoints from the edge of the massive cliffs on Owls Head.  By looking directly across the road (Rt. 25), you see nearby Webster Slide Mountain and Mt. Mist.
Webster Slide Mountain and Mt. Mist as viewed from Owls Head cliff
Zoomed view of Webster Slide Mountain and Mt. Mist (CLICK TO ENLARGE)
When looking slightly to your right (northward), you can see Oliverian Pond below you.
Oliverian Pond viewed from Owls Head cliff 
And to your left, you're looking southward down the valley toward Warren, NH and Carr Mountain.
Southward view from Owls Head looking toward Warren, NH and Carr Mountain
During my descent back to the Blueberry Mountain trailhead, I zoomed in on the long flat summit area of Mt. Moosilauke.  It appears that the snow is quickly disappearing with the arrival of warm Springtime temperatures.
Zoomed view of Mt. Moosilauke summit, as viewed from Blueberry Mountain Trail
Although it would have been very doable to have incorporated Blueberry Mountain into my adventure, I opted not to do so.  Not only had I just been there recently, but I also wanted to allow time for a short hike to Waternomee Falls in nearby Warren, NH.  My only other visit to these falls occurred a few years ago during the winter months.  At that time, the falls were less than impressive (see photo below).  I wanted to give them a second chance by doing a Springtime visit when the water would be flowing.
Waternomee Falls in winter
I started my hike from the designated pull-off on Clifford Brook Road for the Carr Mountain Trail.  In about 25 minutes, I arrived at the spur trail for Waternomee Falls.
Sign at spur trail for Waternomee Falls
Before arriving at Waternomee Falls, you cross a small brook that is a branch of Clifford Brook.  There is a picturesque little cascade off to your right as you cross this brook.
Cascade on a branch brook that flows into Clifford Brook
Regarding my visit to Waternomee Falls, I truly dislike saying unflattering things about this place.  However, this waterfall seemed to be nearly as unattractive in the Springtime, as it was in the Wintertime.  Perhaps it's just me, but no matter from what perspective I viewed it, there was very little appeal.  And to complicate things, I couldn't seem to find a viewpoint which gave a perspective as to the size of this waterfall.  Although it's not huge to begin with, my photos make this waterfall look even smaller than it is.  

Regardless, shown below are two snapshots of the falls that were taken from different spots. 
Collage of two photos of Waternomee Falls taken from two different viewpoints
To sum it up, my visit to Owls Head was an enjoyable experience.  My visit to Waternomee Falls, was less rewarding!