Pages

About Me

My photo
Bethlehem, New Hampshire, United States
E-mail contact: randonneur8@yahoo.com | Facebook: facebook.com/1HappyHikerNH

Text Above Search Box

SEARCH MY BLOG USING TEXT BOX SEEN BELOW:

28 June 2013

Shelburne, NH: A Trek to Basin Falls and to an old Lead Mine

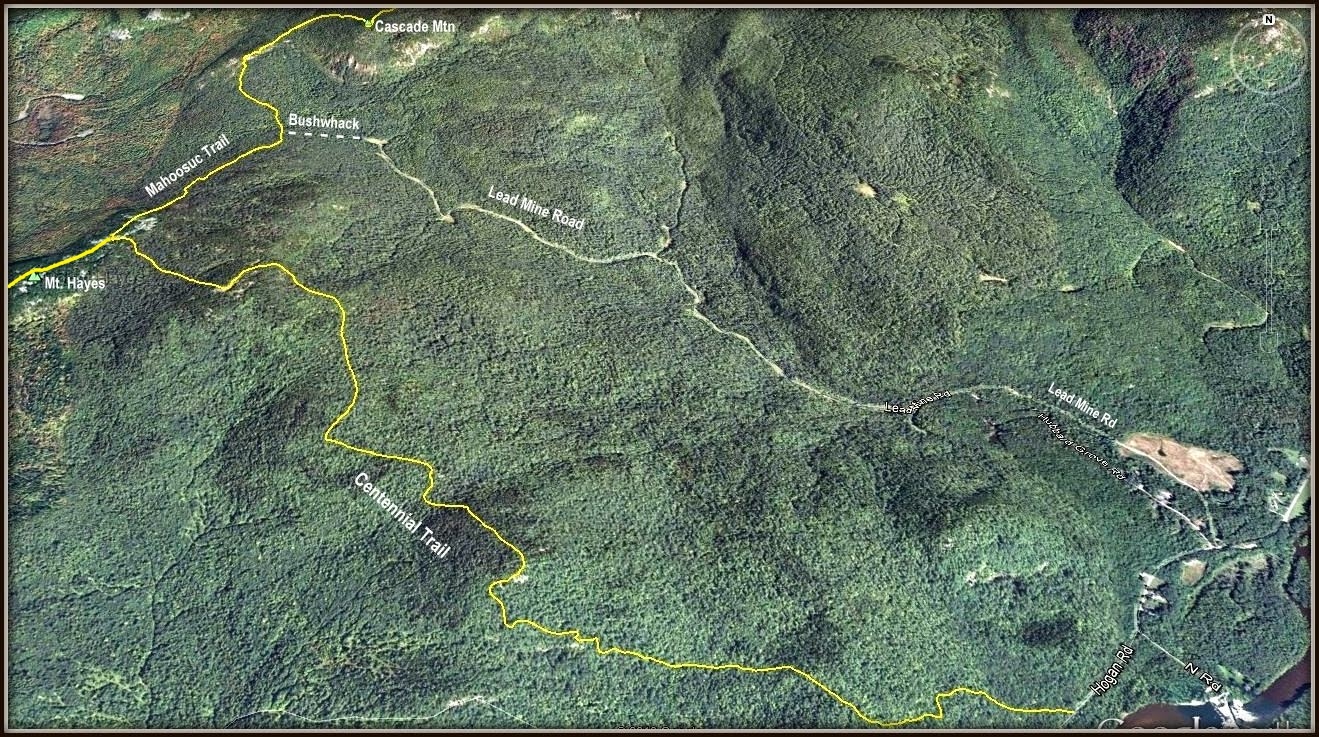
Part 1: Trek to Basin Falls along Pea Brook

A thin peninsula of WMNF land juts down to Rt. 2 on the east side of Pea Brook at a point about 1.5 miles east of Gorham (as measured from the junction of Rt. 2 and Rt. 16).  From Rt. 2, there is a well-maintained trail that heads southward along the Pea Brook drainage for about a mile.  This trail leads to some attractive cascades.  

I've heard some refer to this location as Basin Falls.  But according to Dean Goss who maintains a waterfalls website (click HERE) the cascades on Pea Brook were historically known as the Shelburne Basins.  They are referred to by that name as early as 1891 in Moses Foster Sweetser's  book entitled "The White Mountains: a Handbook for Travellers".

You can park on the road shoulder by squeezing in at a small widened spot on the south side of Rt. 2 immediately after the road crosses Pea Brook.   It is okay to park there as long as all 4 tires are completely off the pavement, but it's a busy road so use extreme caution!  There is no trail sign at the beginning, but there is an obvious footpath, although a bit overgrown in spots.

After following the footpath for 0.1 mile, you arrive at the gas pipeline corridor.  On the other side of the corridor (south side), there is/was a sign that simply read "Basin".  From this point onward, the trail is wide and easy to follow.  There are directional signs at significant turns along the way.  At one turn there is a sign indicating which is the public pathway, and which is private.  The private path leads (I presume) to the White Birches Camping Park.

Shown below is a photo collage that shows some of the signs along the trail.
Photo collage showing some of the signs along the trail along Pea Brook
The next photo collage provides a sampling of the sights that can be seen by following this trail along Pea Brook.
Sampling of the sights that can be seen by following the trail along Pea Brook
As far as I can tell, none of the present-day topographic maps show this trail corridor which leads along the east side of Pea Brook.  However, the trail does show up on some earlier topographic maps.  Shown below is a 1937 map.  I've highlighted the trail in pink.  And, using a dotted line, I've drawn in the corridor that leads from Rt.2 to the junction where you see the "Public/Private" trail sign.  Beyond that sign, the remainder of the corridor is a public trail.
Map showing location of trail along Pea Brook (CLICK TO ENLARGE)
- - - - - - - - - - - - - - - - - - -
Part 2: Trek to an Old Lead Mine

For anyone who might read my Blog on a frequent basis, you will recall that I recently trekked up the entire length of the Lead Mine Road corridor in order to do a loop hike in the southern Mahoosucs. (Click HERE to read that report.)  At the time of doing that trek, I was aware that an old lead mine was located somewhere in the general vicinity.  However, I was uncertain about its location, and didn't really have time to spend snooping around to find it.

Subsequent to the above hike, a Shelburne resident indicated to me that I should begin searching for the mine about a tenth of a mile east of the Lead Mine Road corridor, at a point about 1.5 miles from the junction of North Road and Lead Mine Road.  Using that information, I left Lead Mine Road at a likely spot, and the old mine was eventually located.  Along the route, I encountered some sporadic tape flagging.

Two water-filled entrances to the old mine were spotted.  One was adjacent to a cascade at the upper end of a tributary to Lead Mine Brook.  This entrance could easily have been mistaken for a cave if you didn't know the history of this spot.  The second entrance was spotted lower down on the brook and was much more impressive.  It was partially enclosed by a brick structure.  There was even a chain of some sort that was still attached to a crossbeam that was submerged just under the surface of the water at the lip of the mine entrance.

Below is a photo collage which shows the things mentioned in the above paragraph.
Photo collage showing various aspects of the old lead mine
Perhaps it should be mentioned that neither the upper entrance nor the lower entrance are readily apparent.  If you're not looking for them, then you might walk right by without knowing it.  To illustrate this, the next photo shows the lower entrance as seen when standing just a short distance away.
Lower entrance to old lead mine as seen from just a short distance away
Earlier in this report, reference was made to the trek I'd done along Lead Mine Road just about a week prior to this quest to locate the old lead mine.   On that previous trek, I took some rather pathetic photos of a cascade that is located in the same general vicinity as the lead mine.  

In an attempt to redeem myself, I made a side trip to once again visit this cascade and take some photos which would hopefully be a bit better than before.   Shown below is one of my "second time around" snapshots.  Although it lacks the stunning quality of a true waterfall photographer, it's at least better than my previous endeavor.
Cascade located in Lead Mine Brook drainage
For anyone who might be interested, the following is a brief history of the old lead mine in Shelburne, NH.  About 1820, a rich deposit of lead was found.  Shafts were sunk in 1845 and the mine first opened in the Autumn of 1846.  An engine pumped air into the shaft and water out of it.  The ore was hauled up by a horse-powered windlass.  A large framed building was erected at the site.  In the basement was the heavy crushing machinery and smelting works.  Above were pleasant rooms for the use of the superintendent and others.  A small village sprang up with a dining and cooking house, and several dwelling houses.  However, the enterprise was not profitable, and it was abandoned in 1849. In 1856 the mine was reopened.  One shaft was partially pumped out.  A few blasts were put in, the ore was crushed and put in barrels, and then the mine was once again deserted.  The dam rotted away, and for many years the Shelburne Lead Mine was one of the interesting features of the past.  In 1880, a new dam was built, and water was emptied from the shaft and some mining operations took place.  However, this revival of the mine was also short lived and it was once again abandoned, and remains so to this day.  All that is left  are the shafts (some flooded and others filled in) and the name given to the brook, i.e. Leadmine Brook.

To sum it up, I thoroughly enjoyed the two treks described in this report.  The Pea Brook hike is by no means a "blockbuster" adventure.  However, if you're driving through the area of Gorham/Shelburne, then it's certainly a pleasant way to spend about an hour's worth of hiking. Regarding the trek to the old lead mine, this will have some appeal to those who are comfortable with off-trail travel, and who have an interest in finding artifacts in the forest from times gone by.

20 June 2013

A Fun Adventure in the Southern Mahoosucs

This type of adventure will likely have little appeal to some readers.  Nonetheless, it was the sort of exploit that I find truly enjoyable since most of it was covering ground that was entirely new to me.

Briefly stated, I launched my trek from the parking area at the junction of North Road and Hogan Road.  I walked the short distance eastbound on North Road to Lead Mine Road.  I followed the Lead Mine Road corridor for about 2.7 miles until it ended, and then did a 0.2 mile open-woods bushwhack to the Mahoosuc Trail.  After making a side trip to visit Cascade Mountain, I hiked the Mahoosuc Trail westbound to pick up the Centennial Trail which was used to return to my starting point.  The only part of this loop that I'd previously hiked was the Centennial Trail.

The Lead Mine Road corridor, as I'm told by a local Shelburne resident, is permissible to use for foot travel.  It's very easy to follow, and as can be seen from the Google Earth image below, it shows up very clearly on satellite imagery (click to enlarge) 
Google Earth image showing route for my loop hike (click to enlarge)
The treadway is a bit overgrown in spots, whereas in other spots it's almost trail-like.
A segment of the Lead Mine Road corridor
From the upper end of the corridor, you catch glimpses of some of the ledges on Cascade Mountain.
Some of the ledges on Cascade Mountain as viewed from Lead Mine Road corridor
And speaking of the ledges on Cascade Mountain, the next 3 photos show some views from these ledges.
A view of Presidential Range from ledges on Cascade Mountain
Another view of Presidential Range from other ledges on Cascade Mountain
Eastward view from lower ledges on Cascade Mountain
Just as I was about to leave the ledges on Cascade Mountain, who should come along but Ryan Linn!  Some of you might know him better from his truly excellent Blog named Guthook Hikes. Although this was the first time we'd ever met in person, I recognized him immediately from photos I'd seen of him.  We had a delightful to chat.  And who would've ever guessed that we would meet at such a relatively remote location as Cascade Mountain?

My trek from Cascade Mountain back to my starting point was rather uneventful.  I met a few Appalachian Trail thru-hikers, and I met a large toad (photo below).
Warts and all! A fine looking toad seen along the Centennial Trail
Near the end of my descent, I stopped at a viewpoint on the Centennial Trail where there is a view of Reflection Pond and peaks in the Carter-Moriah mountain range (next photo).
Reflection Pond and peaks in the Carter-Moriah Range, as viewed from Centennial Trail
Perhaps I should also mention that on the way up the Lead Mine Road corridor, I made several excursions off the corridor to explore Lead Mine Brook.  The water flow was remarkably low, especially considering our recent wet weather.

I only found one cascade worthy of a photograph.  However, the image composite shown below is one of the worst I've ever taken of a cascade.  My timing was less than perfect.  When I arrived at this cascade, it was about noon and the sun was directly overhead and illuminating the water like a spotlight.  It didn't matter if I photographed this cascade from the front, or from the side, the reflected light off the water was just too much for my camera to handle!
Cascade along Lead Mine Brook
To sum it up,  I would roughly guesstimate that this was overall about a 9.5 mile trek.  It took about 6 hours of actual hiking time to complete the loop.  However, the time flew away before I knew it.  It was such fun to experience new things at nearly every step of the way!

16 June 2013

Rogers Ledge - What He Said!

The title of this report includes the phrase "What He Said".  I'm referring to the fact that there is nothing of significance that I can add to what Steve Smith has already said about the trek to Rogers Ledge!

Steve's  blog (click HERE) contains an excellent narrative and photos from a few years ago when he and his wife Carol visited Rogers Ledge using the same route as taken by my friend Marty and I on our trek of 15-June-2013.

And, in addition to Steve's blog report, he has also written a very informative document about Rogers Ledge which is available at his Mountain Wanderer website under the tab labeled as "Paths & Peaks". (Click HERE to read that report.)

And so, with that introduction, my report will consist of some brief narrative along with a few snapshots taken during my trek with Marty to Rogers Ledge.

Despite having a view that is perhaps second only the Horn among peaks in the Kikenny region, Rogers Ledge is visited less frequently than many other destinations in the White Mountain area of NH.  The round-trip distance of 8.2 miles discourages some from doing this trek.  Also, this destination isn't included on lists used by most peakbaggers.

There are several routes in the Kilkenny region that can be used to access Rogers Ledge. However, during the summer season the approach from South Ponds offers the shortest and most direct route.  It has a gradual elevation gain of about 1,900 ft. which distributed over an ascent of 4.1 miles.

As we began our hike, Marty and I stopped at one of the many viewpoints along South Pond to take a few snapshots.
Marty taking a photo at South Pond at the start of our trek
We made very few stops on our way up to Rogers Ledge, and we arrived at the top in about 2 hours from the time we left the trailhead.  Just before stepping out onto the massive granite shelf atop the Rogers Ledge cliff, the snapshot shown below was taken.
View seen just before stepping out onto massive granite shelf atop Rogers Ledge cliff
Once out on the shelf, you experience a fabulous and unobstructed 180 degree view.  The next photo shows the view looking southward at the Carter Range and Northern Presidentials which rise above the Crescent Range and the upland plateau at the base of Rogers Ledge.
South view: Carter Range and Northern Presidentials
After snapping photos from the top, I went a short distance (60 ft or so) toward the western end of the ledge in order to get a profile view of the cliff  (see next photo). 
Profile of cliff face at Rogers Ledge.  Quite a sheer drop-off! 
After photographing the profile of this sheer cliff, I clambered my way back to the top to take photos looking to the east and to the west.

The eastward view features the long profile of the Mahoosuc Range on the horizon (next photo).
Eastward view featuring the long profile of the Mahoosuc Range on the horizon
The next photo is basically the same view as above, except I was standing closer to the edge of the ledge!
Eastward view standing close to the edge of the ledge!
The westward view features peaks in the Pilot Range.  The next photo shows Marty admiring the view of notable peaks such as The Horn, The Bulge, and Hutchins Mountain.
Marty admiring the view peaks in the Pilot Range
Pointing my camera southward again, I zoomed in on the Presidential Range to get a closer view into King Ravine which is situated under the watchful eye of Mt. Adams.
Zoomed photo featuring King Ravine in the Northern Presidential Range
In addition to the on-trail views, we also experienced some noteworthy off-trail views.  But before getting into that aspect of our trek, perhaps it might be worthwhile to give you a lay of the land.  The photo shown below was taken in 2009 from an off-trail ledge located on the peak known as The Horn.  This snapshot shows Rogers Ledge, plus some of the other notable landmarks in the vicinity (click to enlarge).
Photo taken from The Horn showing Rogers Ledge, plus other landmarks in the vicinity
As an additional aid to setting the scene, the following map shows locations for two off-trail spots that were visited.
Map showing the locations for two of the off-trail spots that were visited on this trek
Okay, now that the scene is set, here are the photos taken from these off-trail locations.  The first snapshot was taken from a ledge located below and to the east of the Rogers Ledge summit.  From this rather precarious ledge, there is a nice view of Square Mountain and Greens Ledge (next photo).
Square Mtn. & Greens Cliff viewed from ledge below and east of Rogers Ledge summit
The next two snapshots were taken from a ledge on the east side of the mountain known as North Peak.  The first photo shows a profile view of trailless Square Mountain which "boasts the largest cliff face in the Kilkenny" per Steve Smith.
Profile view of Square Mountain as viewed from ledge on east side of North Peak
The ledge on North Peak also provides an interesting view of the backside of Rogers Ledge (next photo).
Backside of Rogers Ledge, as viewed from a ledged on east side of North Peak
On the return leg of our trek, Marty and I made one more short off-trail foray to visit a small cascade located about 100 ft south of the point where the Kilkenny Ridge Trail crosses Cold Stream.  The next photo shows the cascade, as well as the approximate map location for the cascade.
Off-trail cascade with map showing its approximate location
The last 3 photos show some miscellaneous aspects of our hike.  The first snapshot shows a plaque that was attached to a rock at the top of Rogers Ledge to commemorate it receiving this official name in 1964.  It was named for Major Robert Rogers (1727-1795), a New Hampshire native and leader of the famed Rogers’ Rangers, who gained fame in the French and Indian War.  The naming campaign was spearheaded by an Episcopal Bishop (Rt. Rev. Robert Hatch).  (For some very interesting details about the naming of Rogers Ledge, click HERE to access Steve's Smith document at his website.)
Plaque at top of Rogers Ledge to commemorate it receiving this official name in 1964
As we hiked along the Kilkenny Ridge Trail, we saw evidence of recent trail maintenance work.  The next photo shows some fine axe work that was done to remove a blowdown.
Recent trail maintenance along Kilkenny Ridge Trail
And speaking of the Kilkenny Ridge Trail (from South Ponds to Rogers Ledge), the intent of the next photo is to show that there are some sections of the treadway that are smooth and very easy to travel, whereas other sections of the treadway are rocky and uneven.  There are also some segments which are muddy, but I forgot to take a snapshot of one of those sections.  However, I think we all know what mud looks like! :-)
Some segments of Kilkenny Ridge Trail are smooth, whereas others are rocky
To sum it up, the views from Rogers Ledge are worth the 8.2 mile round-trip hike, at least in my opinion.  And, the overall experience can be enhanced by making a few off-trail side trips along the way.
////////////////////////////////////////////////////////////


ADDENDUM (added 17-June-2013):

There is a chapter about Rogers Ledge of Kim Nilsen's book entitled "50 Hikes North of the White Mountains".  
On page 75 of that book, mention is made of the profile of "Rogers's Dog" located on the cliff face of Rogers Ledge.  I followed the directions provided in the book, but was unable to visualize this profile when looking at the cliff face.

However, following the hike, Kim kindly provided me with some additional guidance and I can now see the profile of Rogers's Dog!  It was there all along, and even showed up in my photos!  And so, for anyone else who might have had the same "blind eye" as me, shown below is another photo of the cliff face that I took during this hike.  The dog's profile is outlined in pink, and there is a pink arrow pointing to Rogers's Dog.
Rogers's Dog (outlined in pink, with arrow pointing to it)

10 June 2013

Some Stats about Hiking to Cherry Mountain (Mt. Martha and Owl's Head)

For the past 7 years I've been the volunteer Trail Maintainer for the Martha's Mile Trail located atop Cherry Mountain.  And 2 years ago, I assumed the additional responsibility for maintenance of the Cherry Mountain Trail (east side).  The reason I specify "east side" is because the more popular "west side" of this trail is beautifully maintained by an individual who prefers to be identified only as a "Friend of the Forest".

On 09-June-2013, I did maintenance work on both the Cherry Mountain Trail (east side), and on Martha's Mile.  Over the years, I've frequently met hikers on the Martha's Mile Trail, as well as on the Cherry Mountain Trail (west side).  But surprisingly enough, I've never met another hiker on the Cherry Mountain Trail (east side)!

Presumably, the route from the east side is less travelled because it is the longest of the three routes to Cherry Mountain.  The three routes are as follows:

1) Approach from west side: Cherry Mountain Trail from trailhead located on Rt. 115

2) Approach from north side: Owl's Head Trail: trailhead also located on Rt. 115

3) Approach from east side: Cherry Mountain Trail from trailhead located on Cherry Mtn Rd.

(Up until about 15 or so years ago, there was a 4th route, i.e. the Black Brook Trail which approached from the south.)

The table shown below contains some stats about hiking the 3 existing routes to Cherry Mountain.  The stats for all 3 routes assumes the hike will include both the Mt. Martha and Owl's Head peaks, and that the hike will begin and end at the same trailhead.  For the sake of simplicity, I've omitted other variations, such as spotting a car at a different trailhead, and/or only hiking to one of the two peaks on Cherry Mountain.
Stats regarding hiking to both Mt. Martha and Owl's Head from the 3 trailheads
From studying the above table, you'll see that the east side approach is definitely longer than the other two.  However, it has the least amount of elevation gain, owing primarily to the fact that the trailhead elevation is at 1,650 ft.

Of the 3 approaches, I prefer the gentle grade of the Cherry Mountain Trail (east side), even though it is a longer route.  For about the first 1.5 miles of the trail, there are occasional muddy spots, especially during the Springtime.  Despite that, the footway is generally smooth and a pleasure to walk on.

Cherry Mountain is a popular hike, and as a result, numerous trip reports are generated by hikers each year.  In addition to this one, I alone have written 6 other reports about Cherry Mountain!  If you're interested in accessing those reports, the links are listed below.


Shown below are a series of 8 photos that I've taken at various times of the year during my travels to Cherry Mountain. The first photo is my favorite (to date).  It was taken in late Autumn of 2008 when I met a young couple atop Owl's Head, and who graciously agreed to pose for a photo.
From Owl's Head in late Autumn
From Mt. Martha in early Spring
From Owl's Head in Winter
From Owl's Head in Summer
Sunset on Presidential Range as viewed from Mt. Martha in mid-Winter
Franconia Range as viewed from Mt. Martha in early Spring
Crawford Notch as viewed from Owl's Head in Summer
Zoomed photo of summit of Mt. Washington as viewed from Owl's Head
To sum it up, regardless of which route you choose, or what season of the year you hike to Cherry Mountain, there are many marvelous vistas for your viewing pleasure . . . weather permitting, of course! :-)

05 June 2013

Hanging Out on the Side of Vose Spur

The title of this report might conjure up the image of me hanging off the side of a cliff on Vose Spur, or something of that nature.  Most assuredly, that was not the case!  Instead, I paid a visit to the massive talus fields on the south side of Vose Spur, and hung out there for a while to enjoy the views and take a few snapshots.

Circumstances were such on this particular day that my available time for hiking was compressed.   However, a visit to the talus fields on Vose Spur seemed doable (barely), and so a decision was made to give it a try.   I left home at near 1 PM and was back home by 7 PM.   This was made possible by averaging about 3 mph on the lower end of Signal Ridge Trail and on the Carrigain Notch Trail.  Also, living within a 40 minute drive of trailhead is very helpful!

For anyone who might be unfamiliar with these talus fields, perhaps the photo shown below might be helpful.  This image was taken a couple years ago from  Signal Ridge while en route to Mt. Carrigain.
Encircled on this photo are the talus fields on south side of Vose Spur
The route that I used to the talus fields was different from what I understand to be the traditional route used by most peakbaggers who are intent on conquering the summit of Vose Spur.  I think that particular route leaves from a point not far from  the boundary of the Pemigewasset Wilderness and then heads up the east side of Vose Spur.  However, I could be wrong about that.  Regardless, I left the Carrigain Notch Trail at about 1.3 miles, and then headed up a ridgeline on Vose Spur's south side.

A rough depiction of my bushwhack route is shown in the map below.
Rough depiction of my bushwhack route to talus fields on Vose Spur
The climb to talus fields covered a distance of about 0.75 miles.  It was generally a gradual climb, but became moderately steep on the final approach.  The forest was predominately hardwoods for the entire distance.  There were some obligatory patches of hobble bush lower down. :-)

So what did I see once I arrived?  The next 5 photos will hopefully provide some general idea of the vistas that can be seen from this location.

If I'd taken the time to work at it, I probably could have done a better job of composing a shot which more accurately portrayed the vastness of the talus fields.  Nonetheless, the next photo will perhaps at least provide some idea, even though it shows only a small corner of these massive piles of boulders.
One small corner of talus field on Vose Spur
The next photo shows the main view looking southward.  In the center are peaks such as Bartlett Haystack, Bear Mountain, Mt. Tremont, with pointy Mt. Chocorua on the distant horizon.  On the far right is Mt. Passaconaway.
Un-zoomed photo showing the main view looking southward
The next photo is a zoomed shot which features peaks such as Bartlett Haystack, Bear Mountain, Mt. Tremont, Owls Cliff, and pointy Mt. Chocorua on the horizon on the right side.
Jumble of peaks surrounding Mt. Tremont, plus Mt. Chocorua is on far right
The vista shown in the next photo is looking nearly due south.  Some of the prominent peaks are Mt. Chocorua (at top on far left), and the backside of Green's Cliff (center, right) with Mt. Passaconaway to the right of it (on the horizon).   
Prominent peaks include Mt. Chocorua; backside of Green's Cliff ; Mt. Passaconaway
Looking due west of the talus fields is the prominent view of Signal Ridge leading to Mt. Carrigain.
View of Signal Ridge leading to Mt. Carrigain
To sum it up, this was very enjoyable romp.  The views were unique, and it was a fun challenge to accomplish this hike within the time frame available to me.