Pages

About Me

My photo
Bethlehem, New Hampshire, United States
E-mail contact: randonneur8@yahoo.com | Facebook: facebook.com/1HappyHikerNH

Text Above Search Box

SEARCH MY BLOG USING TEXT BOX SEEN BELOW:

31 July 2012

Breaking My Own Rules: A Visit to Mt. Bemis


This wasn't my first visit to the former fire tower site on Mt. Bemis.  Since I've been there before, and since I used the same route as previous visits, this is at odds with my recent quest to try doing something new and/or different on each of my hikes.   However, since it had been nearly 6-years since my last visit, I considered Mt. Bemis to be a "hike-worthy" destination.  And besides, I'm not adverse to breaking my own self-imposed rules!

There once was a trail leading to the fire tower, as shown below on the 1950 USGS Crawford Notch quadrangle map.  The trail to the Bemis tower is highlighted in green. The Nancy Pond Trail is highlighted in yellow.
1950 USGS Crawford Notch quadrangle map

You'll note that the above map doesn't show the Nancy Pond Trail continuing onward to Nancy and Norcross Ponds. The 1938 hurricane knocked down thousands of trees in the Nancy Brook valley, and as a result, the Nancy Pond Trail (which had just been opened) was closed. It wasn't reopened until 1960!

The route to the tower begins at the trailhead for the Nancy Pond Trail.  At about 1.6 miles where the Nancy Pond trail makes the first major crossing of Nancy Brook, an old Fire Warden's trail diverges right.  Soon after stepping foot on this abandoned trail, there is signage which warns against maintaining this trail.  However, the sign also states that "Public use of these lands is welcome."
USFS Sign posted near beginning of abandoned trail to fire tower on Mt. Bemis

The trail to the old fire tower site is only about 2 miles in length.  Overall, it's a relatively gentle, but steady climb.  However, since it isn't a maintained trail, there are numerous blowdowns to step over, and in many cases, to crawl under.  The majority of this old trail is easy to follow, but there are a few short segments where the trail is so overgrown that it's difficult to locate the pathway, and sometimes you can barely even see your own feet!

Because a few segments of the trail are obscure, it's probably best if you don't attempt this hike if you're unaccustomed to this type of hiking.  And if you do attempt it, you should wear long pants because you're going to get scratched up!

The next photo shows two contrasting segments of trail.  On the left side is "the good", and on the right is the "the bad and the ugly".  Actually, "the bad and ugly" is even more "bad and ugly" in one very small section!
Trail to Mt. Bemis: "the good" (left side); "the bad and the ugly" (right side)

Just before reaching the worst of the "bad and ugly" spots, there is a small opening which provides a nice view looking northward up the Crawford Notch, as seen in the next photo.  In the center is Mt. Willard, and the Willey Range is on the left, and Mt. Webster is on the right side.
Crawford Notch as viewed from trail to Mt. Bemis

As you travel further up the trail, you come to a spot at around 3,150 ft  where there is a beautiful wide-open meadow filled with low-growing shrubs.  The vistas from here are as good as you would experience from a ledge. In my opinion, the views from this meadow are the best part of the entire trek, and would make a worthy destination unto itself.

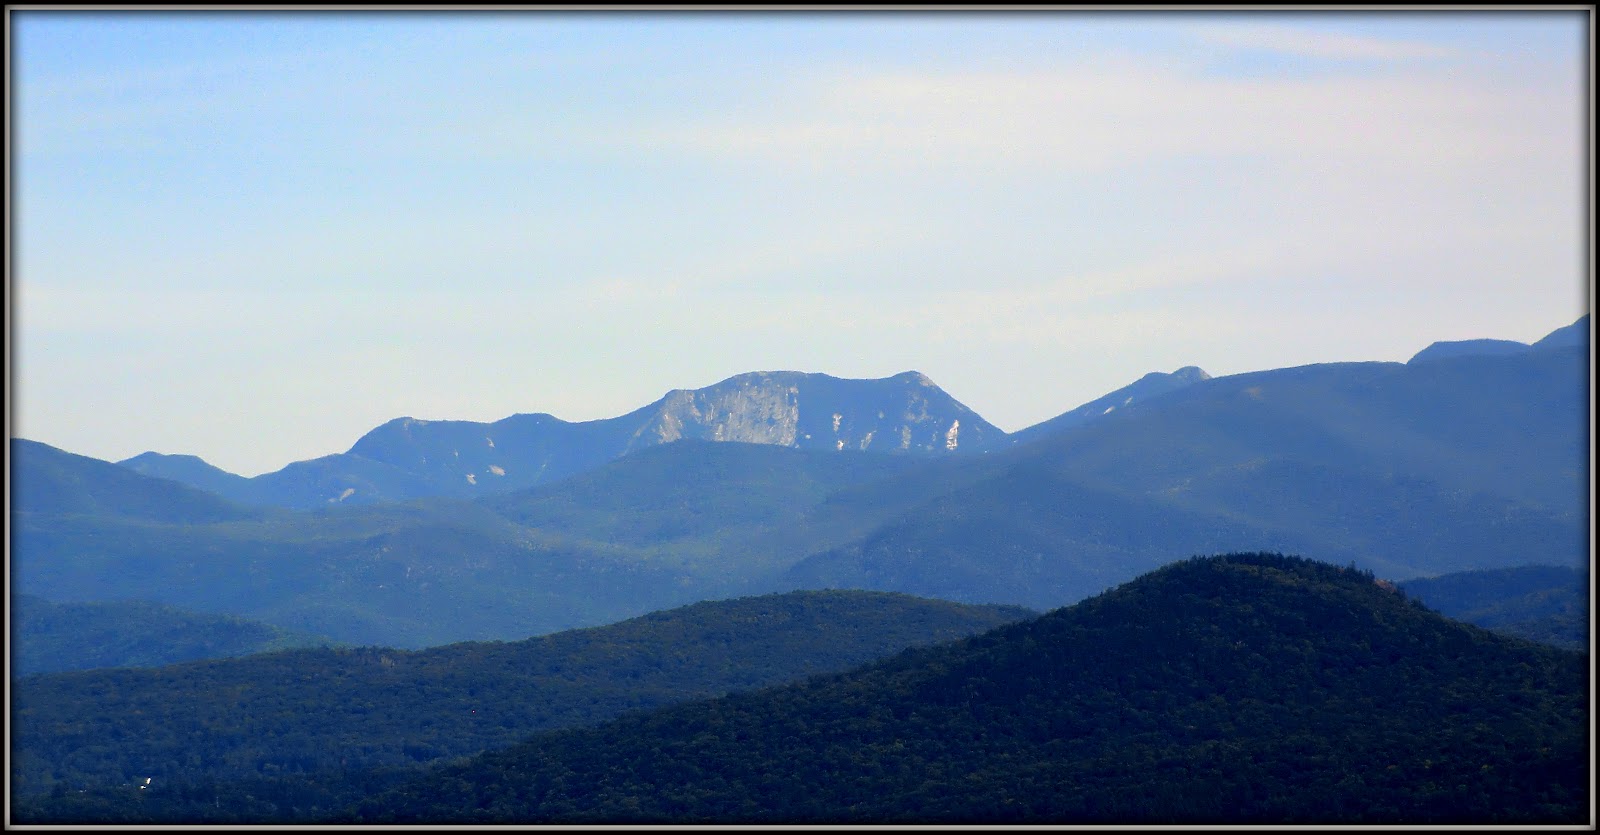
From this meadow, there is a great vista looking southward.  Shown in the next photo is a snippet of this view.  Just as a brief overview, Attitash and the Moats are on the left, where an active thunderstorm was taking place!  And on the right side of the photo are peaks such as Bartlett Haystack, plus Bear Mountain and Mt. Chocorua can also be seen.
Southward view from "the meadows" on trail to Mt. Bemis

There is also a nice easterly vista from "the meadows".  Kearsarge North is the pointed peak that is seen on the horizon in the next photo.
Eastward view from "the meadows" on trail to Mt. Bemis

The next photo is looking northeasterly from "the meadows", where there is a vista that includes a portion of the Presidential Range-Dry River Wilderness, as well as Mt. Washington (and other Presidential peaks) which are seen resting at the north end of Oakes Gulf.
Northeasterly view from "the meadows" on trail to Mt. Bemis

After hiking about 3.7 miles from the trailhead on US 302, you will arrive at the site of the old fire tower.  The tower was actually located on sort of a sub-peak of Mt. Bemis.  The true summit is about 400 ft to the west, and it can be seen off to your left as you approach the fire tower site.  It's a bushwhack to get there, and on this particular trip, I didn't include it in my itinerary.  Been there, done that!

Regarding the Bemis Fire Tower, it was a wooden structure which was 29 ft tall, and was in operation for about 8 years between 1940 to 1948.  The next photo shows what the tower looked like when it was still standing.
Bemis Fire Tower when still standing

The next photo shows a portion of the demolished structure as it appears today.  There are other pieces of the tower that are strewn about here and there.
Portion of the demolished Bemis Fire Tower

Shown in the next photo is a compilation of just a few of other fire tower "body parts", and a few of the many artifacts associated with the tower when it was operational.  And just as a gentle reminder, it is illegal to remove artifacts from the National Forest.
Fire tower "body parts", plus a few of the many artifacts associated with the tower

About the only view from fire tower site is through a narrow opening looking toward the Presidential Range.  The next photo shows a zoomed image of that view.  And as can be seen, even with this confined vista, there is a fairly encompassing view of the vast Presidential Range Dry River Wilderness.  I presume that a major purpose of the old fire tower was to keep watch over that area.
Presidential Range-Dry River Wilderness Area as seen from Bemis Fire Tower site

To Sum it up,  I'm glad I broke my own rules and opted to make a return visit to the site where the Bemis Fire Tower once stood.  It was worth doing just to re-experience the views from "the meadows" area which lies along the abandoned trail.  It might be at least another 6 years before I make another return visit.  But on the other hand, who knows!  Perhaps I'll find this route useful as a launch point for an adventure that is new and different!


(Date of this hike: 30-July-2012)
//////////////////////////////////////

ADDENDUM (added 02-Aug-2012):  A private e-mail was received from Ben English who took the photo of the Bemis Tower when it was still standing.  In part, his communication read as follows:

"Date of my photo of the Bemis Tower is June 25, 1961.  Took it with my first camera, a Brownie Hawkeye.  I was fortunate to have taken that pic.  According to Iris Baird*, that is the only known photo of the Bemis Tower."

* Iris Baird and Chris Haartz are the authors of a book entitled: A Field Guide to New Hampshire Firetowers.

28 July 2012

Mini-Trip to Vermont and the Adirondacks


My wife and I recently did an impromptu whirlwind trip to locations in Vermont, and to the Adirondacks in New York.

The main goal of the VT portion of our adventure was to further explore the awesome Island Line bike trail in the Burlington area.  If you're a regular reader of my Blog, then you might recall that I posted a report in May 2012 about exploring the northern end of this bike trail. (Click HERE to read that report.)

On this most recent trip, we explored the bike trail from Airport Park to North Beach (click HERE for a trail map).  What a marvelous bike trail!  There are many places where you can park your bike and then scamper to Lake Champlain's shoreline.  The wide sandy beaches that are shown in the next series of photos makes it difficult to believe that you're in northern VT, and are only about 40 miles from Canada.  You'd almost think you'd been magically transported several hundred miles away to some location in the southern U.S.!
Lake Champlain: looking southward

Lake Champlain: looking northward

However, one of the things that lets you know that you've not been transported to the far southern part of the U.S. is the presence of northern hardwoods which are adjacent to the sandy beaches.
Manicured hardwood forest adjacent to sandy shores of Lake Champlain

According to one of the informational placards posted at one of the shoreline locations, Lake Champlain did have a saltwater connection several thousand years ago!
Informational placard along the bike trail

Hmmm! I wonder if this ancient saltwater connection has anything to do with the "Lake Champlain Monster" that I spotted along the way (see photo below).
Lake Champlain monster?

And who (you might ask) are the people shown in the next photo?  These are our "guardian angels"!  While biking along the Island Line Trail, I experienced a flat tire!  These kind folks just happened to come along at my "hour of need".  The guy had an entire bike repair kit with him and happened to be a very accomplished bicycle repairman.  Just like a pit crew at the Indy 500, this guy had me back on the trail in very short order!
"Bicycle Repairman" and his wife

After a day of biking in VT, my wife and I headed westward across Lake Champlain for Saranac Lake.  This is a lovely village in the heart of the Adirondack high-peak area.  Shortly after crossing over into New York State on the Crown Point Bridge, we stopped to take a photo looking eastward across Lake Champlain.  At this particular point, there was a yellowish algae near the shoreline.  It made for an interesting scene.  Shown below is the yellow algae, along with a sailboat on the lake, and the very distinctive profile of Camel's Hump Mountain on the horizon (directly behind the sailboat).
Yellow algae, plus sailboat, plus Camel's Hump

When we arrived at Saranac Lake, the weather was deteriorating rapidly.  It was decided to jump right into a short hike (1.8 miles round-trip) to a little nearby peak named Baker Mountain (2,452 elevation).  The next photo shows Baker Mountain as viewed across a pond in the village of Saranac Lake.
Baker Mountain as viewed from pond in Village of Saranac Lake

From Baker Mountain, there was a nice view overlooking McKenzie Pond with a view (on the distant horizon) of the western rock face of the Gothics (I think!).
McKenzie Pond with rock face of the Gothics on distant horizon

The next photo is a zoomed image of what I'm presuming to be the western rock face of the Gothics.
Zoomed image of western rock face of the Gothics

From Baker Mountain, there is also a nice view of areas within the village of Saranac Lake, as well as the many lakes that surround it.
Village of Saranac Lake and surrounding lakes as viewed from Baker Mountain

When we awakened on the day following our arrival in Saranac Lake, it was overcast and drizzling.  We decided to head for home via a circuitous route which would take us by the village of Long Lake, NY.  Many times (and many years ago), we camped along the shore of this lake.  It was fun to re-visit this location after many long years. 

In between the rain showers, we did a 2.2 mile round-trip hike on the Northville-Placid Trail along the eastern shore of Long Lake.  We found a campsite that looked very reminiscent of a place where we had once camped.  We could not be certain that it was the same site.  However, it was fun to fantasize that is was indeed THE spot!
Possible site where we camped many times, many years ago

To sum it up,  although this was merely a mini-trip, it produced maxi-fun!  The Island Line bike trail is beyond awesome. And the miniature hike in the Adirondacks, coupled with our trek down memory-lane was simply precious!

24 July 2012

The Fan: A Destination on the Huntington Ravine Trail


Sometimes it's difficult to get beyond the notion that you must follow a trail all the way to its end in order for it to be a “complete” hike. However, there are several trails where you can create your own destination without hiking the entire length of the trail.

A few days ago, my friend Marty and I decided to hike the Huntington Ravine Trail (HRT). However, rather than hiking the trail to its endpoint at the Alpine Garden Trail, our destination was “The Fan”, which is a large area of broken rock high up on the HRT. From reading the trail description, we determined that this location would provide interesting views looking up at the headwall. In addition, we felt there would be other nice views en route to our destination. But even more important, this would be a new adventure since neither of us had ever hiked the HRT.

This hike “delivered the goods” in every respect! There were picturesque scenes along the way, such as those shown in the next few photos.
One of several cascades along the route

A cascade flowing over a boulder with brilliant green-colored moss

View of neighboring Tuckerman Ravine

Trailside view of Huntington Ravine on the approach to “The Fan”

The route to “The Fan” was no more rugged than many other trails in the White Mountains. However, the segment of trail after “The Fan” is where conditions become much more challenging!!

Once we arrived at “The Fan”, we were treated to the “upward views” of the ravine that we had anticipated. This perspective is very different from the “downward views” into the ravine that we both had experienced on many occasions while hiking along the Alpine Garden Trail.
Looking up at the Huntington Ravine headwall.

Also from our lofty perch upon “The Fan” we got a nice view looking down the ravine toward Wildcat Mountain and surrounding peaks.
Wildcat Mountain and surrounding peaks

By no means was the Huntington Ravine Trail overly crowded with hikers.  However, there were many more people than one might anticipate for a trail that is described in the White Mountain Guide as “the most difficult regular hiking trail in the White Mountains.”

We met several hikers along the way. Some were couples, some were hiking alone, and there was one large group from Rensselaer Polytechnic Institute. We even met on father and son team who were doing the exact same thing as us, i.e. just hiking to “the Fan” as a destination.

Shown below is a zoomed photo of several groups of hikers making their way up the headwall.  
(Click on photo to enlarge it.)
Groups of hikers winding their way up the headwall of Huntington Ravine

We even saw a group of rock climbers scaling a formation within the Huntington Ravine known as “The Pinnacle”.
Rock climbers scaling “The Pinnacle”

The next photo shows “The Pinnacle” (as mentioned above), as well as other named features within the Huntington Ravine, including our destination, i.e. “The Fan”. This snapshot was taken from a large sign posted at Harvard Cabin (more about that later). Obviously, this photo is a winter scene. The ravine also serves as a playground for backcountry skiers.
Huntington Ravine in winter

Okay, regarding the Harvard Cabin, this facility is maintained by Harvard Mountaineering Club for use by the general public. The cabin is operated under a special-use permit granted by the USDA Forest Service. Cabin space and tent-sites are available on a first-come, first-serve basis between December 1st and April 1st each year. Specific instructions for staying at the cabin can be found online (click HERE).
Harvard Cabin

To sum it up, a change of mindset is required to purposely set forth on a hike with no intention of hiking the entire trail to its completion. However, adopting this frame of mind can produce some rewarding experiences. Marty and I thoroughly enjoyed our hiking adventure to “The Fan”. Not only was the trail new to us, but so was the destination. Experiencing new things is always great fun!

21 July 2012

A Traverse of Whitewall Mountain


As indicated in my previous Blog report about a "Mini-Pemi Adventure" (click HERE to read that report), I've fallen far behind in filing reports about my recent hikes.  In an attempt to catch up, I'm trying to be selective and only post hikes which I think might be of interest.  Perhaps a few readers will find something of value in the following narrative and photos about a traverse of Whitewall Mountain.

Many times over the years I've visited the massive ledge complex at the south end of Whitewall Mountain.  However, since I'm indifferent about peak-bagging, none of my visits have included a trek to the actual summit of Whitewall Mountain! Furthermore, I've never approached the ledges from the north.  Instead, I've come in from the south and then climbed the east side of the mountain to reach the ledges.  And on one occasion, I accessed these ledges via a steep and slippery approach by going up a slide on the west side of the mountain.

So, in my quest to try doing something new and different on each of my hikes, I opted to use a north to south approach route, which would be new for me.  In addition, I also decided to incorporate a visit to the actual summit of Whitewall; yet another first for me!

On the map that is shown below, my route is highlighted in pink.  I roughly guesstimate that the entire trek was about 9.6 miles round-trip.
Map showing my round-trip route

The bushwhack up the north face of the mountain was okay.  It was never overly steep.  The only annoyance was the occasional patch of thick hobble bush.  However, this minor irritation was lessened by a beautiful white birch forest surrounding me in all directions.
(Please note that you can get an enhanced view of any photo in this report by clicking on it.)
Hobble bush and birch forest

As an antidote to the hobble bush component (on both the trek up the mountain, as well as the descent) there were huge patches of forest which consisted of a delightful combination of fern and white birch.   For me, it is pure glee to bushwhack in this type of woods.
Fern and birch forest

Moose also take delight in a forest consisting of birch, hobble bush and fern.   At many points along my route, I came across depressions in the ground-cover, such as shown in the next photo.  My assumption is that these were spots where moose bedded down for the night.
Possible bedding spot for moose

At one point, I actually spotted a moose off in the distance who appeared to be warily watching me.  Very quietly and slowly, I pulled out my camera and was able to get one zoomed snapshot.  But literally in the blink of an eye, the moose disappeared into the forest.  I'm always amazed at how something the size of a horse, can simply vanish, and usually without making a sound!
Moose watching me from afar

Upon arrival at the true summit of Whitewall, I signed the log book and then headed for a nearby ledge where I was pleasantly surprised to find such nice views.   This little ledge provided some vistas which I think are superior to those from the massive ledges at the south end of Whitewall.  Specifically, I'm talking about views of the Willey Range, as well as views of Stairs Mountain, and peaks in the Montalban Range (Stairs, Resolution, Crawford).
View of Willey Range from ledge near summit of Whitewall Mountain

View of Stairs, Resolution, Crawford from ledge near summit of Whitewall Mountain

There was also a nice preview of the Carrigain Notch vista from this little ledge.  However, I knew that a more expansive view of this feature awaited me at the ledges on the south end of the mountain.
Carrigain Notch from ledge near summit of Whitewall Mountain

After soaking in the views from the little ledge near Whitewall's summit, it was time to move on to the star attraction, i.e. the massive ledge complex at the south end.  It is always such a thrill for me to pop out onto these open shelves of rock.  The next photo shows the view that greeted me upon arrival.
Carrigain Notch area, as viewed from ledges on south end of Whitewall Mountain

By moving to another spot on this massive ledge complex, I was treated to a vista which included Shoal Pond, as well as the Carrigain Notch.
Shoal Pond plus Carrigain Notch, as viewed from ledges on south end of Whitewall Mountain

Another view that I particularly enjoy from the Whitewall ledges is the vista looking westward, which is shown in the next photo.  It begins with Mt. Guyot on the far left, and ends with Zeacliff on the right side of the picture.  Unfortunately, dark clouds overhead cast a shadow on this view.
Mt. Guyot (left) to Zeacliff (right), as seen from ledges on south end of Whitewall Mountain

The massive Whitewall ledges also include eastward views, such as peaks in the Willey Range and Montalban Range. However, I've already presented photos of these mountain ranges, as viewed from the tiny ledge near Whitewall's summit.

Eventually, the time came when I needed to descend Whitewall and head for home.  Rather than descend the precipitous ledges on the south end of the mountain, I backtracked northward for about a tenth of a mile in order to reach a spot where I knew it would be easy to get down off the mountain.  After descending the steeper parts of Whitewall's east face, I basically headed due south to intersect the Ethan Pond Trail at a point just slightly west of the Thoreau Falls Trail.  Then, once I was on the Ethan Pond Trail, it was straight shot back to the trailhead where I had begun!

On the return leg of my journey, I took a snapshot looking up at the massive cliff on the west side of Whitewall Mountain.
Massive cliff on the west side of Whitewall Mountain

And, I also stopped to take a snapshot of the picturesque wooden bridge at the north end of the beaver ponds on the Zealand Trail.  Once I'm at this point along the trail, I know it will only be about 30 minutes before I'll be sitting in my car and headed for home!
Wooden bridge at north end of the beaver ponds on the Zealand Trail

To sum it up, gheez what a trip!  I visited the actual summit of Whitewall Mountain for the very first time, and I used an approach route that was different from my previous treks to the ledges on the south end of the mountain.  Oh! And I had the rare privilege of seeing a moose in the wild, even though it was only for a brief moment!  And last, but not least, it was a true pleasure to bushwhack through such lovely birch glades.       

20 July 2012

A Mini-Pemi Adventure


Over the past several days I've done several hikes.  However, I've fallen far behind in reporting these on my Blog.  In an attempt to catch up, I've decided to just report two of these treks.  Here is the first one.  Another report will be forthcoming in the next day or so.

This report just barely made "the cut" for a Blog posting.  However, I opted to do a short write-up since it involved an adventure to that special place known as the Pemigewasset Wilderness (a.k.a., the "Pemi").

A recent report by a fellow Blogger named "Just Joe" (Click HERE) inspired me to embark on this adventure.  However, about the only similarity between my adventure and Joe's is that both were in the Pemi, and both incorporated a bike ride on the Lincoln Woods Trail up to the wilderness boundary, at which point, bikes are prohibited.  Shown below is a snapshot taken during the bike ride segment of my trek.
Bike riding along the Lincoln Woods Trail

Joe's adventure was much more aggressive and involved trekking to the remote peaks known as Bondcliff and Mt. Bond, which are located deep into this wilderness area.  By comparison, my adventure just tippy-toed inside the boundary of the Pemi, and did not involve hiking to any high peaks.  Including a short bushwhack, the round-trip mileage was about 9.5 miles. My route is shown on the map below. 
Map showing my route of travel

The only thing about my trek into the Pemi which was semi-unique was that it involved a short bushwhack to the east end of a beaver pond located near the junction of the Franconia Brook Trail and Lincoln Brook Trail.  This beaver pond shows up on GoogleEarth as a body of water.  However, on topographic maps, it is usually depicted merely as a swampy area.  (Please note that on the map shown above, I've hand-drawn the pond into the map.)

As stated above, bushwhacking to the east side of this pond was only "semi-unique". Others occasionally do it.  One such person is of course Steve Smith who wrote about this in one of his Blog reports (click HERE).

As anyone knows who has experienced the Pemi, you get such a feeling of remoteness when hiking there.  The trails are narrow corridors through awesomely beautiful woods.  I find it difficult to capture the "feeling" in a photograph.  Shown below is a segment of typical trail in this wild part of the White Mountains.  However, as I indicated, the photo lacks dimension and feeling.
Segment of trail in the Pemigewasset Wilderness

Okay, so what about this pond that I ballyhooed at the beginning of this report!  Well, looking over the pond from its eastern shore, there is a view of Mt. Flume, as shown in the next snapshot.
View toward Mt. Flume from east end of beaver pond

A wider view from the eastern shore of the pond reveals a feature nicknamed "Owl's Ear".  It is an outcropping of ledges on the southeastern end of Owl's Head Mountain. It can be seen faintly in the upper right side of the next photo.  
Ledges on "Owl's Ear" (upper right of photo).  Mt. Flume and tip of Mt. Liberty are also visible.

Several years ago, two friends (Steve and Chris) and I made a winter bushwhack to "Owl's Ear".  If you're interested in reading about this adventure, then please click HERE.

Although the next image is poor quality, I thought it might be of mild interest to include a zoomed photo of Owl's Ear.
Zoomed photo of "Owl's Ear"

To sum it up, this mini-Pemi adventure was fun and interesting to me.  However, I question whether it has much in the way of mass-audience appeal! :-)